
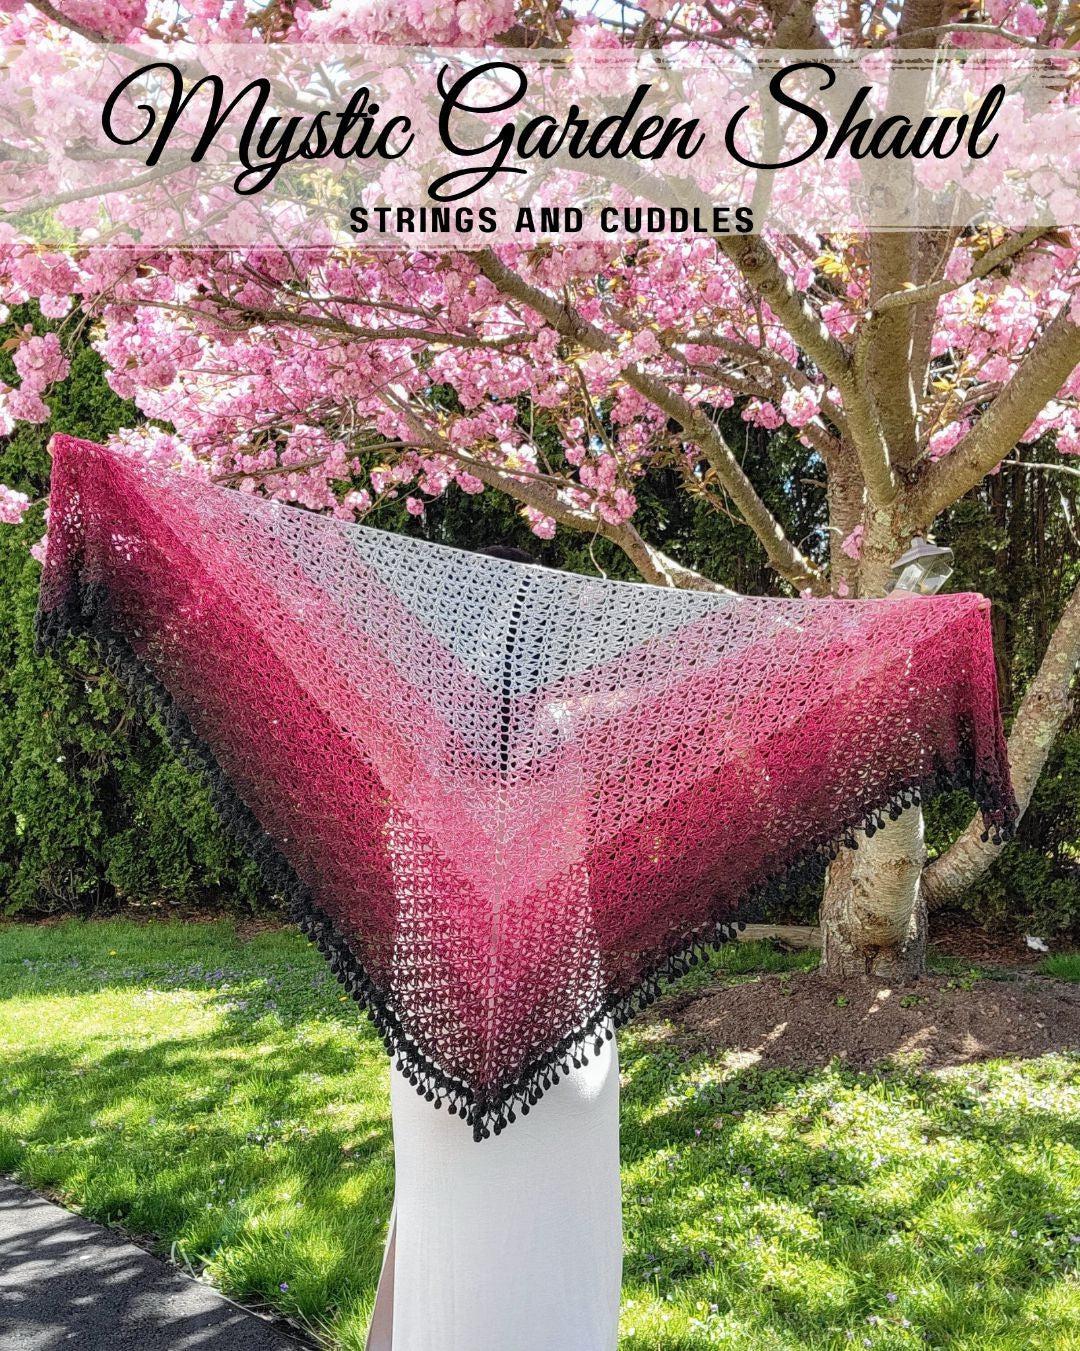
Mystic Garden Shawl Crochet Pattern
It gives me great pleasure to be back here sharing a new pattern that is based on the seasons and nature.
Hi there! I'm Elisa, the creator and designer of Strings and Cuddles. Rena and I collaborated on a project to share with all of you yarn enthusiasts, especially crocheters, using her incredible cotton gradient yarn.
When creating shawls, I adore working with gradient yarn. You may wonder, why? It's because I don't have to consider what colors to use. Gradient yarns, like Rena's, have all the colors pre-mixed and ready to be transformed into any design you can imagine. In addition, I enjoy working with basic, easily memorized stitch patterns. Usually, my designs consist of a few row repetitions with intricate borderwork or edging.

Let me now introduce you to our newest design, the Mystic Garden Shawl. The yarn colorway I used to make my shawl gave rise to the name of the pattern. This yarn's stunning hues, which mimic the amazing pink to red flowers with green leaves that are flourishing in the garden, shout springtime.
Are you eager to get going? Because I am! Now let's get started!

MYSTIC GARDEN SHAWL
Designed by STRINGS AND CUDDLES | ELISA DESENA
This pattern is FREE but you can also purchase the inexpensive PDF file on my Ravelry shop for easy printing and reading. Purchasing the PDF version helps and allows me to continue to share my patterns with you.
SKILL LEVEL: Intermediate
MATERIALS
Fingering Weight (#1) Yarn in Mystic Garden Gradient 8-Ply Cotton Yarn, approximately 1,300 yards
Crochet Hook 4 mm (or size to obtain gauge)
Scissors
Darning Needle
Tape Measure
Optional: Stitch Markers
GAUGE: 20 sts X 9 rows = 4 inches in Double Crochet (unblocked)
FINISHED MEASUREMENT: Approximately 70 (length) x 38 (depth) inches
STITCHES AND ABBREVIATIONS | US Terminology
Ch(s) – Chain(s)
DC – Double Crochet
DC2Tog – Double Crochet 2 Stitches Together
FPSC – Front Post Single Crochet
MR – Magic Ring
Rep – Repeat
SC – Single Crochet
Sk – Skip
Slst(s) – Slip Stitch(es)
Sp(s) – Space(s)
St(s) – Stitch(es)
SPECIAL STITCHES
P – Picot – Chain 3 then slip stitch in the top of the Double Crochet stitch just made.
Shell St – consist of (4 DC + P + 3 DC) all in the same st/sp.
3DC-CL – 3 Double Crochet Cluster – Yarn over, insert hook in a st/sp, yarn over, pull through a st, yarn over, pull through 2 loops on hook, (yarn over, insert hook in the same st/sp, yarn over, pull through a st, yarn over, pull through 2 loops on hook) 2 times, yarn over, pull through all 4 loops on hook.
Pompom Edging Stitch (Pom St) – Ch 3, 3DC-cl in the 3rd ch from the hook (1st cluster just made), ch 3, 3DC-cl in the 3rd ch from the hook (2nd cluster just made). To form the pompom, fold the clusters and sl st to where the 1st cluster begins. There are available video tutorials on YouTube that you can watch if you are not sure how to do this stitch.
NOTES
- Read the pattern carefully before starting.
- This triangle shawl pattern is worked flat in back-and-forth rows, from the (center) top down.
- * * repeat instructions between asterisks as many times as directed or repeat at specified locations.
- ( ) work instructions within parentheses as many times as directed or work a group of stitches all in the same stitch or space.
- I recommend using stitch markers to mark the first stitch and the center chain space of each row so you will not miss it. Remember to move the stitch marker as you progress.
PATTERN INSTRUCTIONS
Start with a MR.
Row 1: Ch 3 (counts as 1 DC throughout), DC into the ring, (ch 2, 2 DC into the ring) 3 times and pull tight the yarn tail to close the ring. Turn.
Row 2: Ch 3, DC in the next st, ch 2, 3 DC in the ch-2-sp, ch 2, DC in the next 2 sts, ch 2 (center ch-sp), sk center ch-sp, DC in the next 2 sts, ch 2, 3 DC in the ch-2-sp, ch 2, DC in the last 2 sts. Turn.
Note: Ch-2-sps will be counted as 2 sts starting in the next row. When skipping stitches, counting is much simpler in this manner. To make the pattern easier to follow, the instructions for each row are divided into two sections, a and b.
Row 3: (a) Ch 3, DC in the 1st st, ch 2, 2 DC in the next st, ch 2, sk 3 sts, SC in the next st, ch 2, sk 3 sts, 2 DC in the next st, ch 2, 2 DC in the next st, ch 2, sk center ch-sp,
(b) 2 DC in the next st, ch 2, 2 DC in the next st, ch 2, sk 3 sts, SC in the next st, ch 2, sk 3 sts, 2 DC in the next st, ch 2, 2 DC in the last st. Turn.
Row 4: (a) Ch 3, DC in the next st, ch 2, 3 DC in the ch-2-sp, ch 2, DC in the next st, DC2Tog in the next 2 DC sts – skipping 5 sts in between, DC in the next st, ch 2, 3 DC in the ch-2-sp, ch 2, DC in the next 2 sts, ch 2, sk center ch-sp,


(b) DC in the next 2 sts, ch 2, 3 DC in the ch-2-sp, ch 2, DC in the next st, DC2Tog in the next 2 DC sts – skipping 5 sts in between, DC in the next st, ch 2, 3 DC in the ch-2-sp, ch 2, DC in the last 2 sts. Turn.

Row 5: (a) Ch 3, DC in the 1st st, ch 2, 2 DC in the next st, ch 2, sk 3 sts, SC in the next st, ch 2, sk 4 sts, (2 DC, ch 2, 2 DC) in the next st, ch 2, sk 4 sts, SC in the next st, ch 2, sk 3 sts, 2 DC in the next st, ch 2, 2 DC in the next st, ch 2, sk center ch-sp,


(b) 2 DC in the next st, ch 2, 2 DC in the next st, ch 2, sk 3 sts, SC in the next st, ch 2, sk 4 sts, (2 DC, ch 2, 2 DC) in the next st, ch 2, sk 4 sts, SC in the next st, ch 2, sk 3 sts, 2 DC in the next st, ch 2, 2 DC in the last st. Turn.

Row 6: (a) Ch 3, DC in the next st, *ch 2, 3 DC in the ch-2-sp, ch 2, DC in the next st, DC2Tog in the next 2 DC sts – skipping 5 sts in between, DC in the next st*; Rep from * to * to the last ch-2-sp before the center ch-sp, ch 2, 3 DC in the ch-2-sp, ch 2, DC in the next 2 sts, ch 2, sk center ch-sp,
(b) DC in the next 2 sts; Rep (a) from * to * to the last ch-2-sp, ch 2, 3 DC in the ch-2-sp, ch 2, DC in the last 2 sts. Turn.
Row 7: (a) Ch 3, DC in the 1st st, ch 2, 2 DC in the next st, ch 2, sk 3 sts, SC in the next st, *ch 2, sk 4 sts, (2 DC, ch 2, 2 DC) in the next st, ch 2, sk 4 sts, SC in the next st*; Rep from * to * to the last 5 sts before the center ch-sp, ch 2, sk 3 sts, 2 DC in the next st, ch 2, 2 DC in the next st, ch 2, sk center ch-sp,
(b) 2 DC in the next st, ch 2, 2 DC in the next st, ch 2, sk 3 sts, SC in the next st; Rep (a) from * to * to the last 5 sts, ch 2, sk 3 sts, 2 DC in the next st, ch 2, 2 DC in the last st. Turn.
Rows 8 – 55: Rep Rows 6 and 7, ending with Row 7. DO NOT fasten off. Continue with the Border/Edging pattern.

BORDER/EDGING PATTERN
Row 56: Ch 3, DC in each st to the center ch-sp, 3 DC in the center ch-sp, DC across. Turn.
Row 57: Ch 1 (does not count as a st throughout), SC in the 1st st, *ch 4, sk 3 sts, SC in the next st*; Rep from * to * across. Turn.
Row 58: Ch 1, SC in the 1st st, *Shell St in the ch-4-sp, FPSC in the next st*; Rep from * to * to the last ch-4-sp, Shell St in the ch-4-sp, SC in the last st. Turn.
Row 59: Ch 1, SC in the 1st st, *ch 5, Pom St, ch 5, sk Shell St, SC in the next st*; Rep from * to * across.

Fasten off. Weave in all ends.
Optional: You can block your shawl to give the stitches a more defined appearance.

You are done! Take pride in displaying your exquisite handcrafted shawl!
Now, it's time to showcase our tester's versions with their choice of Rena's gradient yarn! Please visit their Instagram accounts to view their incredible creations and while you are there, kindly show them some love!
Angela of @yarnandtattoos

Angie of @angied_sass

Kendra of @keporiginals

Michelle of @dr.meeshgirl

Melanie of @lemaniebee

Watch out for Rena's version in her very own Ranunculus colorway.
I would love to see your Mystic Garden Shawl version! Please tag me @stringsandcuddles and use these hashtags to share: #stringsandcuddles, #stringsandcuddlesdesigns, #MysticGardenShawl
Please don’t hesitate to reach out with questions regarding this pattern.
Do not forget to visit my Ravelry shop to check out my other patterns.
Connect with me for more fun and exciting crochet projects:
Instagram | Pinterest | Facebook | Blog | Ravelry